# Training ALBERT with decentralized averaging
This tutorial will walk you through the steps to set up collaborative training with the ALBERT-large-v2 model and the
WikiText103 dataset. It uses Hugging Face [datasets](https://github.com/huggingface/datasets)
and [transformers](https://github.com/huggingface/transformers/) libraries to compute local updates,
using `hivemind.Optimizer` to exchange information between peers.
## Preparation
* Install hivemind: `pip install git+https://github.com/learning-at-home/hivemind.git`
* Dependencies: `pip install -r requirements.txt`
* Preprocess data: `./tokenize_wikitext103.py`
* Upload the data to a publicly available location or ask volunteers to preprocess it locally
## Running an experiment
### First peer
Run the first DHT peer to welcome trainers and record training statistics (e.g., loss and performance):
- In this example, we use [wandb.ai](https://wandb.ai/site) to plot training metrics. If you're unfamiliar with Weights
& Biases, here's a [quickstart tutorial](https://docs.wandb.ai/quickstart).
- Run `./run_training_monitor.py --wandb_project YOUR_WANDB_PROJECT`
- `YOUR_WANDB_PROJECT` is a name of wandb project used to track training metrics. Multiple experiments can have the
same project name.
```
$ ./run_training_monitor.py --wandb_project Demo-run
Oct 14 16:26:36.083 [INFO] Running a DHT instance. To connect other peers to this one, use
--initial_peers /ip4/1.2.3.4/tcp/1337/p2p/XXXX /ip4/1.2.3.4/udp/31337/quic/p2p/XXXX
Oct 14 16:26:36.083 [INFO] Full list of visible multiaddresses: ...
wandb: Currently logged in as: XXX (use `wandb login --relogin` to force relogin)
wandb: Tracking run with wandb version 0.10.32
wandb: Syncing run dry-mountain-2
wandb: View project at https://wandb.ai/XXX/Demo-run
wandb: View run at https://wandb.ai/XXX/Demo-run/runs/YYY
wandb: Run data is saved locally in /path/to/run/data
wandb: Run `wandb offline` to turn off syncing.
Oct 14 16:26:41.064 [INFO] Found no active peers: None
Oct 14 16:26:44.068 [INFO] Found no active peers: None
...
Oct 14 16:37:37.246 [INFO] Step #1 loss = 11.05164
Oct 14 16:39:37.441 [INFO] Step #2 loss = 11.03771
Oct 14 16:40:37.541 [INFO] Step #3 loss = 11.02886
```
### GPU trainers
To join the collaboration with a GPU trainer,
- Install the same dependencies (without `wandb` and `requests`), download the data and unpack it to the experiment
folder;
- If necessary, specify paths: `--dataset_path ./path/to/unpacked/data --tokenizer ./path/to/tokenizer/config`
(see [default paths](./arguments.py#L117-L134) for reference)
- Run:
```bash
./run_trainer.py --initial_peers ONE_OR_MORE_PEERS --per_device_train_batch_size BATCH_SIZE_FOR_YOUR_GPU
```
Here, `ONE_OR_MORE_PEERS` stands for multiaddresses of one or multiple existing peers (training monitors or existing
trainers)
collected from the first lines of their terminal output. For the example above, the (dummy) multiaddresses would be:
```
--initial_peers /ip4/1.2.3.4/tcp/1337/p2p/XXXX /ip4/1.2.3.4/udp/31337/quic/p2p/XXXX
```
What is a multiaddress?
A [multiaddress](https://docs.libp2p.io/concepts/addressing/) is a format for encoding multiple layers of addressing
information that supports a number of different protocols.
In hivemind, we typically operate with multiaddresses that contain a [libp2p](https://libp2p.io/) peer ID (
e.g. `/p2p/XXXX`) together with the information about how to reach it
(e.g., the IPv4 address and TCP port `/ip4/8.8.8.8/tcp/31337` or the information about a relay used
for [NAT traversal](https://docs.libp2p.io/concepts/nat/)).
You may need to change the IP address to a publicly visible one if some of the initial peers are located behind NAT.
If you have any trouble doing this, consider the ["Using IPFS"](#using-ipfs) section.
The `BATCH_SIZE_FOR_YOUR_GPU` should be tweaked so that the model fits into your GPU memory.
For 1080Ti or 2080Ti gpus, a good initial value is 4. For 8GB GPUs, try batch size 1-2.
See the ["Tips and tricks"](#tips-and-tricks) section for more information on setting up collaborative training.
As the peer begins training, it will periodically report training logs in the following form:
```
Dec 28 00:15:31.482 [INFO] albert accumulated 4056 samples for epoch #0 from 2 peers. ETA 0.75 sec (refresh in 0.50 sec)
Dec 28 00:15:31.990 [INFO] albert accumulated 4072 samples for epoch #0 from 2 peers. ETA 0.24 sec (refresh in 0.50 sec)
...
Dec 28 00:15:32.857 [INFO] Step #1
Dec 28 00:15:32.857 [INFO] Your current contribution: 2144 samples
Dec 28 00:15:32.857 [INFO] Performance: 20.924 samples/sec
Dec 28 00:15:32.857 [INFO] Local loss: 11.06709
Dec 28 00:15:33.580 [INFO] Averaged gradients with 2 peers
Dec 28 00:15:38.336 [INFO] Averaged parameters with 2 peers
```
__Sanity check:__ a healthy peer will periodically report `Averaged gradients/parameters with [N > 1]` peers.
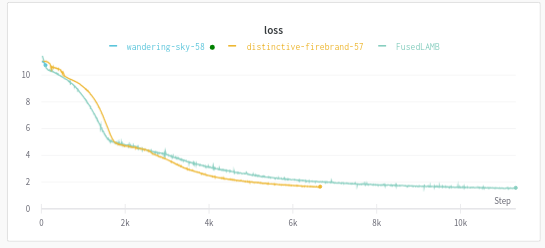
For convenience, you can view (and share!) the learning curves of your collaborative experiments in wandb:
## Tips and tricks
Finally, we provide best practices for running collaborative experiments of different sizes.
### Hosting the data
For small experiments (3-16 peers, <1GB data), you can use a free-tier file hosting that has a convenient way
to [download with curl/wget](https://superuser.com/questions/470664/how-to-download-dropbox-files-using-wget-command).
However, these services are not meant for high load and could ban you for generating too much traffic. If you want to
scale up, you could either use an S3-like storage from [any](https://aws.amazon.com/s3/)
[cloud](https://cloud.google.com/storage) [provider](https://cloud.yandex.com/en-ru/services/storage) or host the data
[yourself]((https://gist.github.com/willurd/5720255)). Large data files (>5GB) will take long to download; we recommend
splitting them into chunks and implementing a custom dataloader that can load chunks on the fly. Finally, the most _
comme il faut_ solution to sharing large datasets is to use [academic torrents](https://academictorrents.com/).
### run_training_monitor.py
This peer exists solely to welcome other peers onto the DHT and track learning progress. It requires neither GPU nor
high bandwidth, the only prerequisite is high uptime. If no high uptime server is available, one can also run multiple
monitors on different servers and list all of them as `--initial_peers`. The system will maintain its integrity as long
as at least one externally accessible participant is available. For short- to mid-term experiments you can host the
monitor on a [free-tier VM](https://www.quora.com/Are-there-any-free-online-virtual-machines).
By default, the training monitor changes its address on restart, so you may launch two monitors on the same machine.
If you'd like to fix the monitor's address (e.g., before sending it to your collaborators),
you need to **(a)** make it listen a specific TCP/UDP port and **(b)** provide a path for storing the identity file
(which allows [libp2p](https://libp2p.io/) to reuse the same peer ID after restart). You may do that like this:
```bash
./run_training_monitor.py --wandb_project YOUR_WANDB_PROJECT --host_maddrs /ip4/0.0.0.0/tcp/31337 --identity_path ./identity.key
```
### Tuning for hardware/network
The optimal training parameters for each peer depend on its GPU and internet connection. If a peer cannot accept
incoming connections (e.g. when in colab or behind a firewall), add `--client_mode` to the training script (see example
below). In case of high network latency, you may want to increase `--matchmaking_time` by a few seconds or
set `--batch_size_lead` to start averaging a bit earlier than the rest of the collaboration. GPU-wise, each peer should
be able to process one local microbatch each 0.5–1 seconds (see trainer's progress bar). To achieve that, we
recommend tuning `--per_device_train_batch_size` and `--gradient_accumulation_steps`.
The example trainer supports
multiple GPUs via DataParallel. However, using advanced distributed training strategies (
e.g. [ZeRO-3](https://www.deepspeed.ai/news/2021/03/07/zero3-offload.html)) will require changes in `run_trainer.py`.
### Using public GPU providers
There are awesome services like [Google Colab](https://colab.research.google.com/),
[Kaggle kernels](https://www.kaggle.com/dansbecker/running-kaggle-kernels-with-a-gpu)
or [Paperspace](https://gradient.paperspace.com/free-gpu) that provide free GPUs. These services usually come with
significant limitations (e.g., last gen GPUs, reset every few hours), but they allow just about anyone to join your
collaborative experiment. Here's how to best use them:
- Before you begin, __read the rules carefully__. Most free-tier GPU services allow only one GPU per user and using
more than one account will get you banned. It is **your** duty to make sure that collaborators won't get in trouble
for helping you.
- Most free GPUs are running behind a firewall, which requires you to run trainer with `--client_mode` (see example
below). Such peers can only exchange gradients if there is at least one non-client-mode peer (GPU server or desktop
with public IP). We recommend using a few preemptible instances with the cheapest GPU you can find. For example, we
tested this code on preemptible
[`g4dn.xlarge`](https://aws.amazon.com/blogs/aws/now-available-ec2-instances-g4-with-nvidia-t4-tensor-core-gpus/)
nodes for around $0.15/h apiece with 8 AWS nodes and up to 61 Colab/Kaggle participants.
- You can create starter notebooks to make it more convenient for collaborators to join your training
run ([example](https://colab.research.google.com/gist/yhn112/e858cb841c73879d8ef98a84e03b43e7/collaborative-training-v0-10.ipynb)).
Ideally, joining collaboration should take at most a couple of clicks.
Here's an example of a full trainer script for Google Colab:
```bash
!pip install transformers datasets sentencepiece torch_optimizer==0.1.0
!git clone https://github.com/learning-at-home/hivemind && cd hivemind && pip install -e .
!curl -L YOUR_HOSTED_DATA | tar xzf -
!ulimit -n 4096 && ./hivemind/examples/albert/run_trainer.py \
--initial_peers ONE_OR_MORE_PEERS \
--logging_dir ./logs --logging_first_step --output_dir ./outputs --overwrite_output_dir \
--client_mode --matchmaking_time 10 --batch_size_lead 300 --gradient_accumulation_steps 1
```
### Using IPFS
If the initial peers for your experiment are located behind NAT and/or you have any trouble with figuring out their
public IP addresses and ports, you can set up hivemind to use the [IPFS](https://ipfs.io) network to find the route to
your peers automatically. To do this, you should specify the `--use_ipfs` option on all peers you are starting
(both trainers and monitors).
After that, it is enough to provide only a [libp2p](https://libp2p.io/) peer ID (e.g. `/p2p/XXXX`) for each initial
peer. No other information (like IP addresses or TCP/UDP ports) is required.